Posts in Category: Paper Mache


Paper Mache – Distressing the Teeth
Now that I had a technique for making teeth, it was time to do some mass production. The picture above is of 28 teeth: formed, sanded, smoothed, gessoed, base coated and first layer of distressing applied. I want the teeth to look old so I have been investigating how to distress them.
I still need a few more layers to build up the antiquing look.
And this is ONLY the lower jaw. I still have another 28 to make for the top.
Paper Mache: Types of Glue – White vs Wood
When I started into paper mache I tried several types of glue but quickly choose traditional white resin glue as my favourite. I surfed for more details but one question intrigued me: white vs wood glue.

Weldbond, Wood and White glues
For my work I use three glues.
- “White glue” or “hobby and craft” – polyvinyl acetate (PVA)
- “Carpenter’s glue” or “wood glue” or “yellow glue” – aliphatic resin emulsion
- “Weldbond” – a brand of glue by FT Ross
Other than Weldbond, I tend to use generic or house brands of white and carpenter’s glue. Here are my observations of each as it pertains to paper mache.
First thing I learned is all white glues are not the same. Some are thicker and made to grab and dry faster. For paper mache you want the basic white glue. I buy it in three litre jugs and fill smaller dispensers. In the image above, the left dispenser with the crazy top is white glue, the right is carpenter glue. I found a four pack of these pictured small squeeze bottles in an art store. I drill a hole in the top then make come sort of cap. Then I fill them as needed.
The small bottle of white glue called “Craft Glue” is an example of a thicker, faster drying glue. I found it too thick for most of my work and tough to control the flow of glue when dispersing in a thin line.

Latch Bail Jar
For paper mache glue I use a latch bail jar. Easy to mix up a new batch (90% white glue, 10% water), quick to open and close. It is important to keep the jar closed when not using it to avoid dried chunks. I usually apply my glue with long flat brushes.
Let’s walk through the three for strengths and weaknesses.
White Glue
- Easiest to find. Cheap.
- Mixes with water for paper mache. I run 10-25% water depending on what I am doing. 10% water is my most common recipe.
- Flexible when dry.
- NOT SANDABLE. Clogs up the sand paper.
- Will not chip. Of you have a drip or clump off of the side it is not easy to break off.
- Softens when exposed to water.
Carpenter’s Glue
- Easy to find.
- Use full strength.
- Sandable when dry.
- NOT flexible. It cracks when bent.
- Chips off if you have drips off to the side.
- Resists water.
- I use when gluing wood parts together such as a tongue depressor to a dowel. The drips out the side chip off easily and you can sand the edges of the bond.
Weldbond
- Use full strength.
- Great for gluing an object to paper mache. Dries fast, strong bond.
- Closes small gaps nicely.
- Shrinks when dried.
- Resists water.
So what’s the best glue for paper mache? For me it is all of them. They each have a purpose.
Paper Mache: Trying Teeth in Pottie Mouth
Not that I had a technique for making teeth, it was time to make some and try them on the jaw.

Tooth Forming Jig
I created nine teeth and attached a short length of bamboo skewer to the bottom. This will serve as the root when putting them into the jar as well as a way to stand them up while painting. I took a board and just drilled a few rows of holes.

Piece of bamboo skewer inserted into the bottom of a tooth.
Here are front and side views of the seat with the teeth inserted in.

Front view of the jaw with nine teeth inserted

Side view of the jaw with nine teeth inserted


Paper Mache: Monster Tooth Maker Results
Steps to form a tooth

Two final teeth sitting on the lower jaw
After much experimenting I have come up with the approach I am using for Pottie Mouth's teeth. As I learn more I will modify this post to reflect what I learn.
- Start with a $9 box of 500 unsterilized 3/4" x 6" tongue depressors
-
Soak a few depressors overnight in waterJun 17 - I tried just boiling dry depressors and it worked fine so I no longer presoak. -
BOIL them in water for 5 minutes - What I do is put the depressors in a pot with water. Then I bring it to a full rolling boil and turn the burner off. Then I let it sit for 10 minutes.
The boiling weakens the hard wood's lignin bond, which makes them pliable - Return them to the jar with water.
- Remove one from the water and towel dry the surface.
This prevents diluting the glue - Select a cut piece of 5/8" dowel
- Cut off the rounded end of the depressor so that it will be flush with the dowel
- Cut the sides to form sharp tooth
-
Add Wood Glue (not white glue) to the depressor where dowel will join
Wood glue is sand-able when dry, white glue is not - Place a piece of wet tongue depressor below between the clamp and the tooth. This acts as a guard against the clamp marking the tooth.
-
Tighten host clamp over end
By placing a piece of hose or popsicle sticks over depressor you can minimize damage from the tight clamp - Place in the jig
- Let dry
It needs to be bone dry. Exposing to a fan or air flow helps speed the process - Remove from jig, remove clamp
- Sand any glue clumps or rough areas
- Fill in side between the depressor and dowel with a mixture of Sheetrock 20 and acrylic paint
- Paint balance of tooth
June 15. I love tuning a process as I work. Today I decided to use an end of wet tongue depressor to protect the tooth from the clamp.
I added step 10 to put a piece of wet depressor between the clamp and the tooth. I also predrilled the dowel so that I can arrange them on my tooth stand.

Using a piece of cut off depressor end to protect the tooth from the clamp.

View 1 of the Jig

Dowel and tooth stand
View 2 of the Jig
Tooth Variations
I made several variations of teeth. Here are some of them.

Seven variations on making teeth
- 7 - This is one of the originals. Note the use of a square cut 1/2" dowel and marks on the face from the hose clamps.
- 6, 5, 4 - These show the tooth front of variations on 7 where I tried building a transition on the back with paper mache. The problem is the paper on the front hurts the appearance of the tooth. The backs shown below aren't very appealing either.
- 1 - This is a 5/8" dowel with a sloped cut at top. The clamp marks have been minimized with a piece of hose
- 3 - The side is just painted. White glue was used so the extra clumps of glue could not be sanded or removed
- 2 - The side is filled in with acrylic paint thickened up with some Sheetrock 20. Sheetrock is a sandable drywall compound. The 20 means that mixed with water it will harden in 20 minutes. You can also get 5 and 90. As most of my drying is dependant on the drying of the paint, 20 was a good compromise

This shows the issue with trying to smooth the transition on the back
Here are the final teeth in side and front view.

Final teeth in front and side views.


Paper Mache: Monster Tooth Maker
Next technique to develop is creating the teeth. In Wilburine, I worked out an approach of bending wet wood coffee stir sticks. For Pottie Mouth, I need much larger teeth. Coffee stirs would be too thin.
I decided to use 3/4" x 6" tongue depressors. A box of 500 unsterilized sticks was $9. They are hard wood, and when, soaked in water become pliable. Using nails on wood, I could bend them, but this still creates a flat tooth. I call my next idea a "Monster Tooth Maker."

Monster tooth maker from the side and head on
I modified the jig setup from Wilburine. First, I used finishing nails and drilled holes just a tiny bit smaller with a drill press and then pressed in the nails. This gave me perfectly vertical nails. I put some tubing over them, as finishing nails are steel and leave a rust spot on the depressor.
As I tried making teeth, it became apparent that the end needed to be rounded. To create the round effect, I bought some 1/2" copper plumbing fittings and 1" hose clamps. Then I found some 1/2" dowel. Now instead of the copper fitting, I used a short length of dowel as the core with two host clamps. I also cut up some split vinyl tubing to use as shims to tune the bending. Be sure to towel dry the tongue depressor where you are adding glue for the dowel to avoid thinning the glue. My intent is to paper mache over the base of the tooth once formed to give a solid shape.
Once dry, the ends can be cut into a point for the tooth top. It is better to cut the bottom before drying, as the curved wood tends to split when cut curved and dry.

Vinyl hose splints were added to increase the curve, as well as a dowel at the bottom of the tooth

Close-up of the dowel and clamps

With 1/2" dowel the depressor is splitting

Cut dry tooth with wet one in the jig
This image is of a dried tongue depressor, glued to the dowel, bent into shape and cut to form the point. The surface is raw, but a thin layer of paper towel paper mache will fill in the back, as well as smooth the surface.
The top image is of the jig with a finished tooth, including a thin layer of kraft paper towel mache to smooth out the transition.

Max size tooth sitting on the lower jaw
This is the maximum full-sized tongue depressor sitting on the lower jaw of the toilet seat. This would be suitable for the fangs, but most will be shorter. Once I have several formed teeth, I will work on the paper mache layer.
Paper Mache: Gullet / Throat
The past two weeks have been consumed with attempting a repair on my computer, ordering a new one, waiting then rebuilding from backup and getting everything to work again. Fun wow!
Today I got back to “Pottie Mouth.” I did some cleanup on the bracing and removed the bottom seat to install the gullet. A trip to a used clothing store yielded a little girls red stretch tube top. This will be turned inside out and installed as the gullet/throat. This first required building a template to mount the top on then glue to the bottom of the seat.

The seat was removed, a tracing of the seat inside made on the cardboard and then cut out.
The tube top was stretched over the cardboard frame then placed on the seat bottom and glued in place. I rested heavy books on it to press it in place.

The gullet (red tube top) is glued in place. The bottom will be secured to create a more direct path.
Paper Mache – Be Afraid to go to the Bathroom
While I am not an air brush person, I loved the idea. Off to the store to buy a wood toilet seat.

Head on view

Side Angle

Akin Vong

Front view - looking down the throat.

Panel mounted on the easel showing the hardware details.
Articles About my Paper Mache Fish – Wilburine
Two of my favourite websites for information on how to paper mache have included Wilburine.
Gourmet Paper Mache
Click to view the post
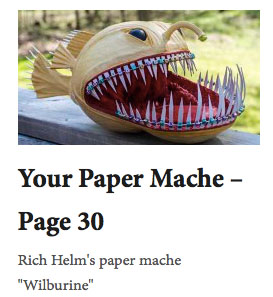
Dan (the monster-man) Reeder is a premier maker of paper mache dragons. Dan has written several books and his blog is one of the go-to places on the web for ideas and techniques. In Your Paper Mache page 30, Dan includes Wilburine.
Ultimate Paper Mache
Another favourite is Ultimate Paper Mache by Jonni Good. This is a source of recipes and tip on other approaches to paper mache. This site is where I got the idea to mix egg carton pulp with acrylic paint to make a rough filler for the edge of the mount inside. I wrote a guest post for Jonni on the making of Wilburine.

Click to view the article
They are both rich sources of ideas and techniques. Thanks Dan and Jonni.


Paper Mache Angler Fish – Wilburine is Finished

Wilburine Finished 3

Wilburine Finished 4

Wilburine Finished 6

Wilburine Finished 2


Paper Mache Angler Fish – Wilburine Gets Gessoed

Tiny gaps around the eyes are filled in.

The gaps between the skewers and the two paper sides are filled.

Screen colours do no justice but I am leaning toward browns and yellows with red oxide tones.